
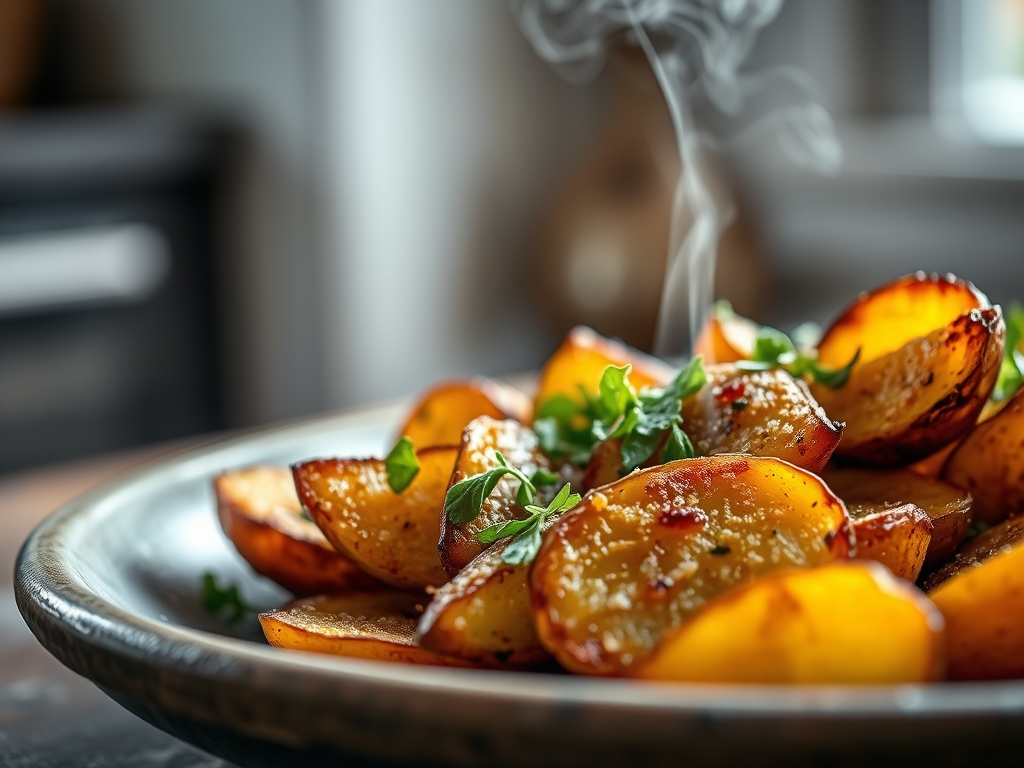
Picture a kitchen filled with the scent of rosemary-infused oil and the rhythmic sound of a sharp chef's knife hitting a wooden board. You are after that specific, elusive texture: a glass-shattering exterior that gives way to a center as creamy as custard. When searching for fingerling potato recipes oven methods often fail because they treat these heirloom tubers like standard Russets. Fingerlings are unique; they possess a dense, waxy cell structure and a higher sugar-to-starch ratio that requires a specialized thermal strategy.
We are moving beyond the soggy, oil-slicked wedges of the past. Today, we are engineering the perfect side dish using molecular principles to ensure every bite is a textural masterpiece. This process is not just about heat; it is about managing surface moisture and maximizing the Maillard reaction. We will use a heavy-bottomed sheet pan to act as a heat sink, ensuring that the contact point of every potato undergoes intense browning. Grab your apron and a glass of wine; we are about to turn a simple root vegetable into the undisputed star of your dinner table.

The Gathers:
To achieve professional results, your mise-en-place must be precise. Start with two pounds of Russian Banana or French Fingerlings. These varieties are prized for their nutty flavor and ability to hold their shape under high heat. You will also need high-quality fat. While olive oil is classic, rendered duck fat or clarified butter (ghee) provides a higher smoke point and a more viscous mouthfeel.
For seasoning, gather flaky sea salt, freshly cracked black peppercorns, and four cloves of garlic. Do not mince the garlic yet; we will use a microplane later to create a fine paste that adheres to the skin without burning. Fresh woody herbs like rosemary and thyme are non-negotiable. Their essential oils will infuse the fat during the roasting process.
Smart Substitutions:
If you are out of fingerlings, small Red Bliss potatoes can work, though they lack the signature oblong shape. For a vegan-friendly version with a deep umami punch, swap the butter for a neutral avocado oil mixed with a teaspoon of nutritional yeast. If you want a piquant kick, a dusting of smoked paprika or Aleppo pepper adds a beautiful crimson hue and a subtle heat that cuts through the richness of the starch.
The Clock
Efficiency in the kitchen is all about the Chef's Flow. You should expect a total active prep time of 15 minutes and a passive roasting time of 35 to 40 minutes.
The flow begins with the "Pre-Heat Phase." Your oven needs at least 20 minutes to reach a stable 425 degrees Fahrenheit. During this time, you will wash, dry, and slice the tubers. The "Active Roasting Phase" involves a mid-way flip to ensure even browning. Finally, the "Resting Phase" is five minutes of patience. This allows the internal steam to redistribute, preventing the crust from becoming soggy the moment it hits the plate.
The Masterclass
1. The Precision Cut
Using a sharp knife or a bench scraper to organize your piles, slice each fingerling lengthwise. This creates a large surface area for the Maillard reaction to occur. Aim for uniformity so every piece finishes at the same time.
Pro Tip: Cutting potatoes increases the surface area exposed to heat. This triggers enzymatic browning, where cellular enzymes react with oxygen to develop complex flavor compounds before the heat even hits.
2. The Par-Boil Shortcut
Place your sliced potatoes in a pot of cold, salted water. Bring to a boil and simmer for just five minutes. You are looking for "fork-tender" exteriors while the core remains firm. Drain them thoroughly in a colander.
Pro Tip: This step gelatinizes the surface starches. When these starches eventually hit the hot oil in the oven, they dehydrate into a crispy, glass-like crust that is impossible to achieve with raw roasting.
3. The Rough-Up Technique
Once drained, give the colander a vigorous shake. You want the edges of the potatoes to look slightly fuzzy or frayed. This creates "starchy slurry" on the surface.
Pro Tip: By increasing the surface roughness, you create more "nooks and crannies" for the fat to settle into. This increases the total surface area for evaporative cooling, leading to a crunchier finish.
4. The Fat Emulsification
In a large bowl, toss the warm potatoes with your chosen fat, salt, and pepper. Use a saucier to melt your butter or duck fat beforehand so it coats every millimeter of the potato skin evenly.
Pro Tip: The warmth of the par-boiled potatoes helps the fat achieve a lower viscosity, allowing it to penetrate the frayed edges of the starch more deeply for a more integrated flavor.
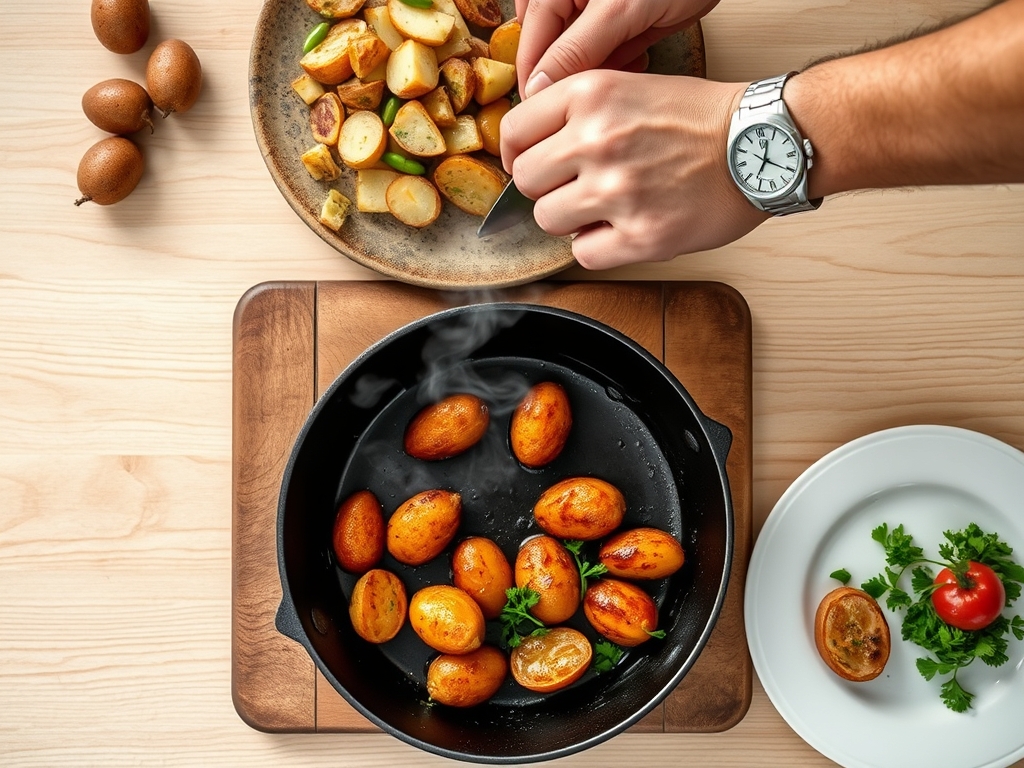
5. The Pre-Heated Pan
Place your empty heavy-duty baking sheet in the oven for five minutes before adding the potatoes. When you finally drop them on, you should hear a loud, aggressive sizzle.
Pro Tip: This utilizes conductive heat transfer. Starting on a hot surface prevents the potatoes from sticking and immediately begins the searing process, locking in internal moisture.
6. The Flat-Side Down Rule
Using tongs, arrange every single potato cut-side down. Do not crowd the pan. If the potatoes are touching, they will steam instead of roast, leading to a limp texture.
Pro Tip: Crowding the pan creates a localized humid environment. By leaving space, you allow moisture to aerate and escape, which is essential for the dehydration required for crispness.
7. The Aromatics Infusion
Ten minutes before the potatoes are done, toss in your smashed garlic cloves and herb sprigs. If you add them too early, the high heat will turn the garlic bitter and the herbs to ash.
Pro Tip: This late addition allows the volatile oils in the herbs to infuse the fat without the compounds breaking down from prolonged high-heat exposure.
8. The Carryover Finish
Remove the pan when the potatoes look a shade lighter than your desired final color. Let them sit on the hot tray for five minutes before serving.
Pro Tip: This accounts for thermal carryover. The internal temperature continues to rise slightly, and the residual heat from the pan finishes the crisping process without burning the delicate skins.
9. The Acid Brightness
Just before serving, use a microplane to zest a fresh lemon over the tray and sprinkle a tiny bit of Maldon salt. The acid cuts through the heavy fats perfectly.
Pro Tip: Adding acid at the end provides a chemical contrast to the fats. It stimulates the salivary glands, making the savory, earthy flavors of the potato feel more vibrant and less heavy.
The Deep Dive
Macro Nutrition: Fingerling potatoes are surprisingly nutrient-dense. A standard serving provides approximately 110 calories, 2 grams of protein, and 0 grams of fat (before adding your roasting fats). They are excellent sources of Vitamin B6 and Potassium, which are vital for nerve function.
Dietary Swaps: For a Keto-friendly alternative, swap half the potatoes for cauliflower florets or radishes, which mimic the texture when roasted. For Vegan guests, use a high-quality extra virgin olive oil and finish with nutritional yeast for a "cheesy" profile. This recipe is naturally Gluten-Free.
The Fix-It:
- Soggy Potatoes: Usually caused by overcrowding. Fix by returning them to a higher heat (450F) on a fresh, dry pan for five minutes.
- Burnt Garlic: This happens if garlic is added too early. Fix by discarding the burnt bits and tossing the potatoes in a fresh garlic-infused oil post-roast.
- Sticking to Pan: This means the pan wasn't hot enough or you didn't use enough fat. Use a metal spatula to gently pry them off, or use parchment paper next time.
Meal Prep: To reheat, avoid the microwave at all costs; it turns the starch gummy. Instead, use an air fryer at 375F for four minutes or a dry skillet over medium heat to re-crisp the skins.
The Wrap-Up
Mastering fingerling potato recipes oven style is a rite of passage for any home cook looking to elevate their Sunday roast or weeknight dinner. By understanding the relationship between surface starch, fat viscosity, and conductive heat, you have moved from following a recipe to practicing culinary science. These potatoes are golden, crunchy, and utterly addictive. Serve them hot, share them with friends, and watch as they disappear faster than you can say "Maillard reaction."
The Kitchen Table
Can I use frozen fingerling potatoes for this?
Yes, but skip the par-boiling step. Thaw them completely and pat them extremely dry with paper towels to remove excess moisture before tossing in fat and roasting as directed.
Why are my potatoes still soft after 40 minutes?
Your oven temperature might be inaccurate. Use an oven thermometer to verify the heat. Also, ensure you aren't using a glass baking dish, which doesn't conduct heat as efficiently as metal.
Do I really need to peel fingerling potatoes?
Never! The skin of a fingerling is incredibly thin and delicate. It provides structural integrity and contains most of the earthy, nutty flavor that makes this variety special.
What is the best oil for the highest crunch?
Rendered animal fats like duck fat or beef tallow provide the best results due to their high smoke points and unique fatty acid chains that create a superior crust.
How do I keep them warm for a dinner party?
Place them in a single layer on a wire rack over a baking sheet in a 200 degree oven. The rack allows air to circulate, preventing the bottoms from getting soggy.